Once Nashi-jo, Iron Spider and I first joined this contest we had no clue on what to do but finally with a lot of hard work and thinking this was our outcome...

“The Deaths Of A Thousand Men Mean Nothing For The Knowledge That May Come Of It”
The Story
It is often said that a person who is written to myth or legend is no longer man or mer, but some higher species. For Mora's Disciple at least, this much is true.
As a child who was greatly gifted in all the schools of magic, this Dunmer quickly drew the attention of The Lord of Knowledge. Upon his rise to adulthood, the Dunmer was greeted by Hermaeus Mora, who saw in the elf a great promise. The ability to hold true power.
It is said that the Daedra brought the Dark Elf to Apocrypha, where he granted him some of his unholy power to use on the mortal plain, evolving him beyond the species of Dunmer. However, as is so often the case with legends, no one can be sure.
Mora brought the Disciple back to Nirn, after filling him with the lust for eternal knowledge. The Disciple collected any rare or unique item that he could find, and then his gaze rested upon a truly powerful artifact - the Staff of Worms. The prospect of having such a strong piece of history was far too tempting. And so the Disciple left his home of Solsthiem on a two month trip to Cyrodiil in search of the staff. Unfortunately the artifact was well hidden. The Disciple heard nothing of the relic during his search, and his scouring of the great Cyrodiilic libraries bore no fruit either. So, smart enough to know when to accept defeat, he decided to return to Skyrim. There was still much to be gathered and cataloged for Lord Mora.
But fate has a funny way of disrupting plans, and whether or not Hermaeus was twisting the Disciple's destiny, fate still had its part to play. On the way back he was ambushed by a group of imperials chasing some rebels, and even with the hostility between his race and the Nords, he was assumed to be with them.
The Build

Race: Dark Elf.
Skills (Perked): Destruction, Alteration, Light Armour and Alchemy
Skills (Unperked): One-Handed, Sneak (when needed) and Block (when needed)
Skills (Buffed): All of the above (Excluding Alchemy)
Stone: Lord, the extra AR will make it that little bit more of a tank and the magic resistance is always helpful.
Shouts: Slow time, Become Ethereal
Skills
Alchemy: While Mora’s Disciple is not the best swordsman, his grasp of alchemy is so strong that he may boost his skill with a blade to a level that parallels the most experienced of warriors. And while he does not actively create and use poisons, he is extremely reliant upon potions that make him a far better ally, and far more dangerous enemy… (The key to this build, alchemy will be used to buff any unperked skill that the keeper may need.)
Alteration: Mora’s Disciple believes that the ability to bend the physical world to his every whim is necessary for complete, unending knowledge. He uses flesh spells to create an arcane shield that reinforces the light Armour he wears.(Alteration was used to get that extra bit of defence in and for the magic resistance.)
Destruction: As the Disciple’s main source of damage output, the school of destruction, namely fire and shock magic, is regularly used by the Dunmer. He uses his strong knowledge of the arcane to summon burning torrents and fiery blasts, scorching all who would stand in the way of knowledge.(Kind of self-explanatory.)
Light Armour: Mora’s Disciple knows how to mix the best qualities - damage and defence, strength and agility – so he uses light Armour to battle efficiently. (This was chosen as we wanted to perk the skill to get a better AR.)
Gameplay
When we started the creation of this build we sought to remove the limitations that were given to us when we couldn’t perk certain skills so we went with, what seemed to be the best option at the time, Alchemy. By using this, before basically unused by myself, we created the ultimate strategy, if you need it, buff it. By doing this we were able to make the disciple attune to any situation near instantly, you will find a list of the buffing potions used below:
Potions

Stone-Arm Elixir
Effects: Fortify Block
Ingredients: Tundra Cotton and Bleeding Crown

Mora’s Embrace
Effects: Invisibility and Heath Regen
Ingredients: Luna Moth Wing and Vampire Dust
Mora’s Blessing
Effects: Fortify Destruction, Fortify Magicka and Restore Magicka
Ingredients: Briar Heart, Ectoplasm and Glowing Mushroom

Strategist’s Draught
Effects: Fortify One-Handed, Fortify Light Armour, Fortify Sneak
Ingredients: Luna Moth Wing, Hanging Moss and Purple Mountain Flower.

These potions allowed us multiple stances do deal with nearly any situation:
Stance 1: The Stone-Arm (note that before initiating this stance that Become Ethereal should be used for safe passage into the stance)

When the disciple finds himself up against an enemy that he cannot hope
to defeat with offense
alone, he switches to the ‘The Stone-Arm’ stance in which he swaps his sword for a shield, casting his strongest flesh spell, casting a whirlwind cloak, equipping his strongest destruction spell and to top it ouff he drinks his Stone-Arm Elixir to give him a major boost in his blocking capabilities allowing the disciple to take a lot more hits and give him a good amount of damage as well.
Stance 2: The Embrace of Shadows
When the disciple is wounded and in need of help he drinks ‘Mora’s Embrace’ to call upon the assistance of his lord to shroud him in an invisible cloak and gift him with health regeneration to allow him to heal as the disciple’s enemies search for their foe (works better at higher levels of alchemy).
Stance 3: Apex Mage

When the disciple is in need of mass amounts of damage in little time, Mora’s Disciple drinks the Blessing of his master to evolve his arcane capabilities to their maximum, increasing his destruction prowess and further increasing his Magicka reserves allowing the disciple to blast away enemies like rag dolls.
Stance 4: Advanced Strategist
When the disciple is faced with the opportunity to flank the enemy or is in need of close combat against multiple enemies he drinks the ‘Strategist’s Elixir’ to give him such capabilities to increase his swordsmanship and ability to blend better into his surroundings to give his enemies an untimely demise...
Stat Placement: 2 Health / 2 Magicka/ 1 Stamina (Until 200) then:
2 Health / 3 Magicka / 0 Stamin

Perk Placement Level 50
Mora’s Disciple has now fully regained his power and sets out to retrieve the Dragon Priest Masks as well as returning to his home of Solsthiem to commune with his master once again.
After discovering the secrets of all of his Lord’s Black Books he will be ready to defeat Miraak, the one who deserted Hermaeus Mora, he shall pay the ultimate price...
Roleplay
1: The Disciple refuses to partake in the petty squabbles of mere man, and so he chooses not to partake in the Civil War.
2: One of the Disciple’s first goals is to seek out his master’s Infinium. However, he believes that the book is too sacred and worships it instead of taking any particular path. Also, the Disciple must retrieve this artefact before communing with his Lord again; i.e. playing the Dragonborn questline (should be done before or at level 30).
3: After collecting the Oghma Infinium, Mora’s Keeper will be able to begin the journey to Apocrypha, where he will once again speak with his master. For the best experience with this character, it is ideal to reunite Hermaeus Mora with his artefact, along with every other Daedric artefact in Skyrim (i.e. leave the book on the table at the end of any Black Book, and the rest in any vessel in Apocrypha)
4: Many other relics should be collected to live up to the builds character. For example, the dragon priest masks should be gathered and stored in the Disciple’s home in Raven Rock, along with the Staff of Magnus.
Equipment:
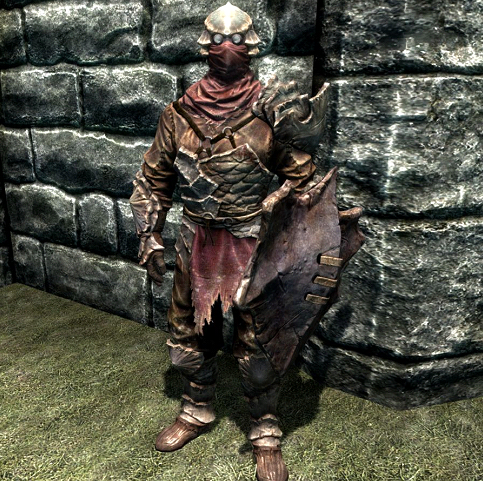
Head: Chitin Light Helmet of Eminent Alteration
Chestplate: Chitin Light Armour of Eminent Destruction
Gauntlets: Chitin Light Bracers of Eminent Alchemy
Boots: Chitin Light Boots of Flame Suppression
Shield: Chitin Shield of Eminent Blocking
Sword: We had an Ebony Sword of the Blaze, but any sword with a fire enchantment will do.
The Team
Screenshots and Gameplay Testing: Eoin Forker
Story, Research (Lore) and Skill Descriptions: Iron Spider
Build Concept, Research (Gameplay) and Write up: Nashi-jo (Previously Known as Oisin Donnelly)
Screenshots: Ponty
Also thanks to Mason for his advice and help.
I hope you enjoyed this contest build we had a lot of fun making it.
Once Nashi-jo, Iron Spider and I first joined this contest we had no clue on what to do but finally with a lot of hard work and thinking this was our outcome...
“The Deaths Of A Thousand Men Mean Nothing For The Knowledge That May Come Of It”
The Story
It is often said that a person who is written to myth or legend is no longer man or mer, but some higher species. For Mora's Disciple at least, this much is true.
As a child who was greatly gifted in all the schools of magic, this Dunmer quickly drew the attention of The Lord of Knowledge. Upon his rise to adulthood, the Dunmer was greeted by Hermaeus Mora, who saw in the elf a great promise. The ability to hold true power.
It is said that the Daedra brought the Dark Elf to Apocrypha, where he granted him some of his unholy power to use on the mortal plain, evolving him beyond the species of Dunmer. However, as is so often the case with legends, no one can be sure.
Mora brought the Disciple back to Nirn, after filling him with the lust for eternal knowledge. The Disciple collected any rare or unique item that he could find, and then his gaze rested upon a truly powerful artifact - the Staff of Worms. The prospect of having such a strong piece of history was far too tempting. And so the Disciple left his home of Solsthiem on a two month trip to Cyrodiil in search of the staff. Unfortunately the artifact was well hidden. The Disciple heard nothing of the relic during his search, and his scouring of the great Cyrodiilic libraries bore no fruit either. So, smart enough to know when to accept defeat, he decided to return to Skyrim. There was still much to be gathered and cataloged for Lord Mora.
But fate has a funny way of disrupting plans, and whether or not Hermaeus was twisting the Disciple's destiny, fate still had its part to play. On the way back he was ambushed by a group of imperials chasing some rebels, and even with the hostility between his race and the Nords, he was assumed to be with them.
The Build
Race: Dark Elf.
Skills (Perked): Destruction, Alteration, Light Armour and Alchemy
Skills (Unperked): One-Handed, Sneak (when needed) and Block (when needed)
Skills (Buffed): All of the above (Excluding Alchemy)
Stone: Lord, the extra AR will make it that little bit more of a tank and the magic resistance is always helpful.
Shouts: Slow time, Become Ethereal
Skills
Alchemy: While Mora’s Disciple is not the best swordsman, his grasp of alchemy is so strong that he may boost his skill with a blade to a level that parallels the most experienced of warriors. And while he does not actively create and use poisons, he is extremely reliant upon potions that make him a far better ally, and far more dangerous enemy… (The key to this build, alchemy will be used to buff any unperked skill that the keeper may need.)
Alteration: Mora’s Disciple believes that the ability to bend the physical world to his every whim is necessary for complete, unending knowledge. He uses flesh spells to create an arcane shield that reinforces the light Armour he wears.(Alteration was used to get that extra bit of defence in and for the magic resistance.)
Destruction: As the Disciple’s main source of damage output, the school of destruction, namely fire and shock magic, is regularly used by the Dunmer. He uses his strong knowledge of the arcane to summon burning torrents and fiery blasts, scorching all who would stand in the way of knowledge.(Kind of self-explanatory.)
Light Armour: Mora’s Disciple knows how to mix the best qualities - damage and defence, strength and agility – so he uses light Armour to battle efficiently. (This was chosen as we wanted to perk the skill to get a better AR.)
Gameplay
When we started the creation of this build we sought to remove the limitations that were given to us when we couldn’t perk certain skills so we went with, what seemed to be the best option at the time, Alchemy. By using this, before basically unused by myself, we created the ultimate strategy, if you need it, buff it. By doing this we were able to make the disciple attune to any situation near instantly, you will find a list of the buffing potions used below:
Potions
Stone-Arm Elixir
Effects: Fortify Block
Ingredients: Tundra Cotton and Bleeding Crown
Mora’s Embrace
Effects: Invisibility and Heath Regen
Ingredients: Luna Moth Wing and Vampire Dust
Mora’s Blessing
Effects: Fortify Destruction, Fortify Magicka and Restore Magicka
Ingredients: Briar Heart, Ectoplasm and Glowing Mushroom
Strategist’s Draught
Effects: Fortify One-Handed, Fortify Light Armour, Fortify Sneak
Ingredients: Luna Moth Wing, Hanging Moss and Purple Mountain Flower.
These potions allowed us multiple stances do deal with nearly any situation:
Stance 1: The Stone-Arm (note that before initiating this stance that Become Ethereal should be used for safe passage into the stance)
When the disciple finds himself up against an enemy that he cannot hope
to defeat with offense
alone, he switches to the ‘The Stone-Arm’ stance in which he swaps his sword for a shield, casting his strongest flesh spell, casting a whirlwind cloak, equipping his strongest destruction spell and to top it ouff he drinks his Stone-Arm Elixir to give him a major boost in his blocking capabilities allowing the disciple to take a lot more hits and give him a good amount of damage as well.
Stance 2: The Embrace of Shadows
When the disciple is wounded and in need of help he drinks ‘Mora’s Embrace’ to call upon the assistance of his lord to shroud him in an invisible cloak and gift him with health regeneration to allow him to heal as the disciple’s enemies search for their foe (works better at higher levels of alchemy).
Stance 3: Apex Mage
When the disciple is in need of mass amounts of damage in little time, Mora’s Disciple drinks the Blessing of his master to evolve his arcane capabilities to their maximum, increasing his destruction prowess and further increasing his Magicka reserves allowing the disciple to blast away enemies like rag dolls.
Stance 4: Advanced Strategist
When the disciple is faced with the opportunity to flank the enemy or is in need of close combat against multiple enemies he drinks the ‘Strategist’s Elixir’ to give him such capabilities to increase his swordsmanship and ability to blend better into his surroundings to give his enemies an untimely demise...
Stat Placement: 2 Health / 2 Magicka/ 1 Stamina (Until 200) then:
2 Health / 3 Magicka / 0 Stamin
Perk Placement Level 50
Mora’s Disciple has now fully regained his power and sets out to retrieve the Dragon Priest Masks as well as returning to his home of Solsthiem to commune with his master once again.
After discovering the secrets of all of his Lord’s Black Books he will be ready to defeat Miraak, the one who deserted Hermaeus Mora, he shall pay the ultimate price...
Roleplay
1: The Disciple refuses to partake in the petty squabbles of mere man, and so he chooses not to partake in the Civil War.
2: One of the Disciple’s first goals is to seek out his master’s Infinium. However, he believes that the book is too sacred and worships it instead of taking any particular path. Also, the Disciple must retrieve this artefact before communing with his Lord again; i.e. playing the Dragonborn questline (should be done before or at level 30).
3: After collecting the Oghma Infinium, Mora’s Keeper will be able to begin the journey to Apocrypha, where he will once again speak with his master. For the best experience with this character, it is ideal to reunite Hermaeus Mora with his artefact, along with every other Daedric artefact in Skyrim (i.e. leave the book on the table at the end of any Black Book, and the rest in any vessel in Apocrypha)
4: Many other relics should be collected to live up to the builds character. For example, the dragon priest masks should be gathered and stored in the Disciple’s home in Raven Rock, along with the Staff of Magnus.
Equipment:
Head: Chitin Light Helmet of Eminent Alteration
Chestplate: Chitin Light Armour of Eminent Destruction
Gauntlets: Chitin Light Bracers of Eminent Alchemy
Boots: Chitin Light Boots of Flame Suppression
Shield: Chitin Shield of Eminent Blocking
Sword: We had an Ebony Sword of the Blaze, but any sword with a fire enchantment will do.
The Team
Screenshots and Gameplay Testing: Eoin Forker
Story, Research (Lore) and Skill Descriptions: Iron Spider
Build Concept, Research (Gameplay) and Write up: Nashi-jo (Previously Known as Oisin Donnelly)
Screenshots: Ponty
Also thanks to Mason for his advice and help.
I hope you enjoyed this contest build we had a lot of fun making it.


